Saturday, December 26, 2020

Installation of MySQL(MariaDB) and phpMyAdmin on Ubuntu LTS focal (20.04)

Coming back again, "ten years after", trying to cope with this incredible mess that has resulted from the -admittedly- very good effort of MySQL (and MariaDB) developers to make our databases more secure. Towards this aim, they decided not to allow -at all- the remote login of root user and therefore, "the root MySQL (MariaDB) user is set to authenticate using the auth_socket plugin by default rather than with a password" [1], although at the beginning of the process of securing the db (step 7 below), the sudoer is asked to provide a new password for root user in order to perform subsequent security operations. 

And even if "this allows for some greater security and usability in many cases, but it can also complicate things when you need to allow an external program -like phpMyAdmin- to access the user" [1], it appears that this "complication", in case of phpMyAdmin, is easily resolved  by a) giving a (strong) password for phpmyadmin user in step 4 below, rather than letting dbconfig-common to randomly generate one, without success b) performing MySQL securing operations (step 7 below) after installing and configuring phpMyAdmin and c) creating a new superuser to access phpMyAdmin web interface, instead of root (step 8).

However, there is no problem to install MariaDB and phpMyAdmin following the instructions in links [3] and [4] respectively.

In what follows, it is assumed that sudoer' s name is usbuntu and machine's hostname is host    

1. Install apache2:

usbuntu@host$ sudo apt install apache2
2. Install MySQL:
usbuntu@host$ sudo apt install mysql-server
3. Install php and php-mysql module:

usbuntu@host$ sudo apt install php php-mysql

4. Install phpMyAdmin and during installation configure phpMyAdmin as follows:

usbuntu@host$ sudo apt install phpmyadmin php-mbstring


5. Append the line

Include /etc/phpmyadmin/apache.conf 

       to /etc/apache2/apache2.conf :

usbuntu@host$ sudo vi /etc/apache2/apache2.conf

6. Restart apache2

usbuntu@host$ sudo systemctl restart apache2

7. Secure mysql (Attention: there is no way to return to shell prompt unless you provide password below and I think -didn't check it- unless you answer all questions afterwards)

usbuntu@host$ sudo mysql_secure_installation

VALIDATE PASSWORD COMPONENT can be used to test passwords
and improve security. It checks the strength of password
and allows the users to set only those passwords which are
secure enough. Would you like to setup VALIDATE PASSWORD component?

Press y|Y for Yes, any other key for No: y

Please enter 0 = LOW, 1 = MEDIUM and 2 = STRONG: 1 (although 2 is more secure)

Please set the password for root here.

New password: ********

Re-enter new password: ********


Estimated strength of the password: 100

Do you wish to continue with the password provided?(Press y|Y for Yes, any other key for No) : y

Remove anonymous users? (Press y|Y for Yes, any other key for No) : y

Disallow root login remotely? (Press y|Y for Yes, any other key for No) : y

Remove test database and access to it? (Press y|Y for Yes, any other key for No) : y

Reload privilege tables now? (Press y|Y for Yes, any other key for No) : y

8. Create new superuser (i.e. supuser) -with full privileges- to connect to phpMyAdmin (replace give_strong_password_here with the password of your choice)

usbuntu@host$ sudo mysql
mysql> CREATE USER 'supuser'@'localhost' IDENTIFIED WITH mysql_native_password BY 'give_strong_password_here';
mysql> GRANT ALL PRIVILEGES ON *.* TO 'supuser'@'localhost' WITH GRANT OPTION;
mysql> quit
 
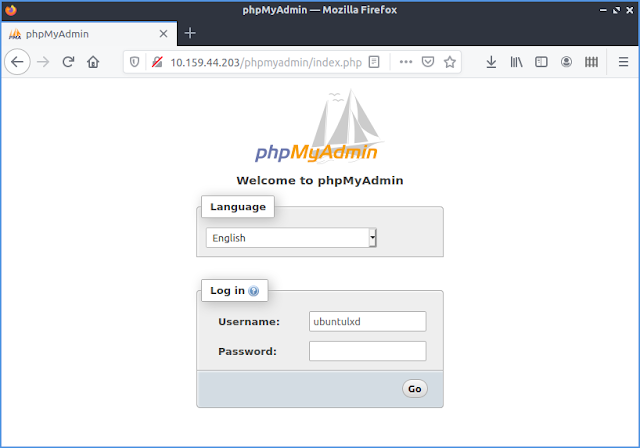
"You should now be able to access the phpMyAdmin web interface by visiting your server’s domain name or public IP address followed by /phpmyadmin. e.g. http://example.com/phpmyadmin or http://192.168.1.10/phpmyadmin"[2] or http://localhost/phpmyadmin or http://127.0.0.1/phpmyadmin, using credentials supuser and give_strong_password_here
 

Versions

Ubuntu LTS focal (20.04)

MySQL Server version: 8.0.22-0ubuntu0.20.04.3 - (Ubuntu)
Apache version: 2.4.41 (Ubuntu)
PHP version: 7.4.3
phpMyAdmin version: 4.9.5deb2

Links


Sunday, August 14, 2011

Installation of the latest eclipse Java EE IDE in (K)Ubuntu 11.04 x64

Prerequests
  • Java JRE (ubuntu packages sun-java6-jre or openjdk-6-jre).
  • Current Ubuntu repositories package (eclipse 3.5 (galileo)), which will be purged after installation/configuration of the latest eclipse. If it is not present install it using the command:
    sudo apt-get install eclipse
Download

Installation/Configuration
  • To (temporally) install the latest version (placed for example in ~/Downloads) at /usr/lib/eclipse_indigo/eclipse, open a terminal and give the commands:
    cd /usr/lib
    sudo mkdir eclipse_indigo
    cd eclipse_indigo
    sudo tar zxvf ~/Downloads/eclipse-jee-indigo-linux-gtk-x86_64.tar.gz
  • Keep the current (executable) script:
    sudo cp /usr/bin/eclipse /usr/bin/eclipse.curr
  • Purge ubuntu eclipse:
    sudo apt-get purge eclipse
    sudo apt-get autoremove
  • Move (as root) the latest eclipse from /usr/lib/eclipse_indigo/eclipse to /usr/lib:
    sudo rm -r /usr/lib/eclipse
    sudo mv /usr/lib/eclipse_indigo/eclipse /usr/lib
    sudo rmdir /usr/lib/eclipse_indigo
  • Move back (as root) the executable /usr/bin/eclipse:
    sudo mv /usr/bin/eclipse.curr /usr/bin/eclipse
  • Open as root the file /usr/bin/eclipse and change all occurrences of galileo to indigo.
  • Copy /usr/lib/eclipse/eclipse.ini to /etc
    sudo rm /etc/eclipse.ini
    sudo cp /usr/lib/eclipse/eclipse.ini /etc
  • As root create the file /usr/share/applications/eclipse.desktop to make a new (kde) menu entry:
    [Desktop Entry]
    Comment[en_US]=
    Comment=
    Exec=/usr/bin/eclipse
    GenericName[en_US]=Eclipse 3.7 (Indigo)
    GenericName=Eclipse 3.7 (Indigo)
    Icon=/usr/lib/eclipse/icon.xpm
    MimeType=
    Name[en_US]=eclipse
    Name=eclipse
    Path=
    StartupNotify=true
    Terminal=false
    TerminalOptions=
    Type=Application
    X-DBUS-ServiceName=
    X-DBUS-StartupType=
    X-KDE-SubstituteUID=false
    X-KDE-Username=
    X-Ubuntu-Gettext-Domain=desktop_kdebase
    If this entry is placed in "Lost & Found" menu category, move it to "Development", using the KDE Menu Editor.

Relevant Links

Installation of latest Liferay IDE (using eclipse-postgreSQL+postgis) in (K)ubuntu 11.04 x64

Prerequests

  • Java JRE (ubuntu packages sun-java6-jre or openjdk-6-jre).
  • Latest eclipse (click here for installation instructions)
  • PostgreSQL 9 (click here for installation instructions).

Downloads

Installation

Assuming that
  • liferay portal and plugins sdk will be installed in home directory and
  • downloded files are placed in ~/Downloads
open a terminal and give the commands:
cd
unzip Downloads/liferay-portal-tomcat-6.0.6-20110225.zip
mkdir liferay-plugins-sdk-6.0.6
cd liferay-plugins-sdk-6.0.6
unzip ../Downloads/liferay-plugins-sdk-6.0.6-20110225.zip

Problems

For eclipse/Liferay to be able to correctly locate PostgreSql/postgis jdbcs:
cp ~/liferay-portal-6.0.6/tomcat-6.0.29/lib/ext/postgresql.jar ~/liferay-portal-6.0.6/tomcat-6.0.29/lib/ext/postgresql.jar.1
cp ~/Downloads/postgresql-9.0-801.jdbc4.jar ~/liferay-portal-6.0.6/tomcat-6.0.29/lib/ext/postgresql.jar
sudo cp /opt/PostgreSQL/9.0/PostGIS/java/jdbc/postgis* ~/liferay-portal-6.0.6/tomcat-6.0.29/lib/ext

Next Steps

To set PostgreSQL as the default database of Liferay:
  • Extract the file create-minimal-postgresql.sql from the downloaded liferay-portal-sql-6.0.6-20110225.zip,
  • create database lportal using the command
  • psql -f create-minimal-postgresql.sql -U <user_name>
  • and follow the instructions of this link to configure Liferay.

Friday, August 12, 2011

Installation of the latest (postgis enabled) PostgreSQL in (K)Ubuntu 11.04 x64

Download
Latest version of  PostgreSQL Graphical Installer (for the time being is postgresql-9.0.4-1-linux-x64.bin)

Installation
  • To install  PostgreSQL at /opt directory, call the Graphical Installer:
  • sudo chmod 0755  postgresql-9.0.4-1-linux-x64.bin
    sudo ./postgresql-9.0.4-1-linux-x64.bin
  • Optionally, install  postgis-1.5, using the Application Stack Builder before closing Graphical Installer. Otherwise, you may install it later, by calling the Application Stack Builder entry in your (kde/gnome) menu (after resolving the corresponding problems (see below)).

Configuration
Edit ~/.profile and append the line

source /opt/PostgreSQL/9.0/pg_env.sh
at the end, to update $PATH and set other env variables (you have to logout/login, for this change to take effect).

Problems
  • Execution of
  • /opt/PostgreSQL/9.0/stackbuilder/bin/stackbuilder
    executable failed, with a number of messages for missing libraries. The following links to (installed) libraries had to be set:
    sudo ln -sf  /usr/lib/x86_64-linux-gnu/libtiff.so.4.3.3 /usr/lib/x86_64-linux-gnu/libtiff.so.3
    sudo ln -sf /lib/x86_64-linux-gnu/libexpat.so.1.5.2 /lib/x86_64-linux-gnu/libexpat.so.0
    Depending on your current installation, other links to libraries (or the libraries themselves) may be missing as well. You have to locate those libraries (and if they miss, to install them) and make the corresponding links.
  • To be able to run stackbuilder from the (kde) menu entry, edit (as root) the file
  • /usr/share/applications/pg-stackbuilder-9_0.desktop
    and change the line
    Exec=/opt/PostgreSQL/9.0/scripts/launchstackbuilder.sh
    to
    Exec=kdesudo /opt/PostgreSQL/9.0/scripts/runstackbuilder.sh
  • To correct the (postgis related) problem of "$libdir/postgis-1.5.so not found", execute the command:
  • sudo ln -sf /opt/PostgreSQL/9.0/lib/postgis-1.5.so /opt/PostgreSQL/9.0/lib/postgresql/postgis-1.5.so

Thursday, April 1, 2010

Keyboard layout configuration for Lubuntu 10.04 Beta1

For a (permanent) usa/greek keyboard configuration, using alt+shift for language switching:
  • sudo vi /usr/lib/X11/xorg.conf.d/05-evdev.conf
  • and modify
Section "InputClass"
Identifier "evdev keyboard catchall"
MatchIsKeyboard "on"
MatchDevicePath "/dev/input/event*"
Driver "evdev"
EndSection
to
Section "InputClass"
Identifier "evdev keyboard catchall"
MatchIsKeyboard "on"
MatchDevicePath "/dev/input/event*"
Driver "evdev"
Option "XkbLayout" "us,gr"
Option "XKbOptions" "grp:alt_shift_toggle"
EndSection
Change gr above to your language symbols, to get the proper keyboard layout.

Tuesday, September 22, 2009

How to expand a WinXP virtual disk in Virtual Box

(Thanx to user "gushy" in this thread) do the following:
  • Create a new disk using Virtual Disk Manager (in VirtualBox goto File -> Virtual Disk Manager)
  • download System Rescue CD
  • set your current VM to have the new disk image as it's second hard disk and the System Rescue CD iso file as it's CD
  • boot the vm from the CD
  • at the command prompt type startx
  • when X Windows starts, type gparted in the terminal that is open on screen
  • in gparted select the windows partition and choose copy
  • select the second hard disk
  • right click on the representation of the disk and click paste
  • gparted will prompt you for the size of the disk, drag the slider to the max size
  • click apply
  • wait .......
  • when it's done right click on the disk and choose Manage Flags, and select Boot
  • exit gparted and power off the VM
  • change the VM settings to only have one disk (the new bigger disk) and deselect the iso as the CD.
  • boot the VM into your windows install on it's new bigger disk!

Installation of MySQL(MariaDB) and phpMyAdmin on Ubuntu LTS focal (20.04)

Coming back again, "ten years after", trying to cope with this incredible mess that has resulted from the -admittedly- very good e...